Zigbee with Home Assistant - Smart Home
This is a second post in the Smart Home series. See the previous post if you haven’t already: https://blog.michal.pawlik.dev/posts/smarthome/smart-home-getting-started/. Last time we have set up the HA (Home Assistant), in this post we’ll learn about Zigbee and control some devices.
Zigbee
Zigbee is a specification for wireless communication protocols, very common solution for building home automation networks.
Explaining new terms is always easier when there’s something well known you can relate to, so before describing Zigbee let’s recall something familiar, the typical WiFi network.
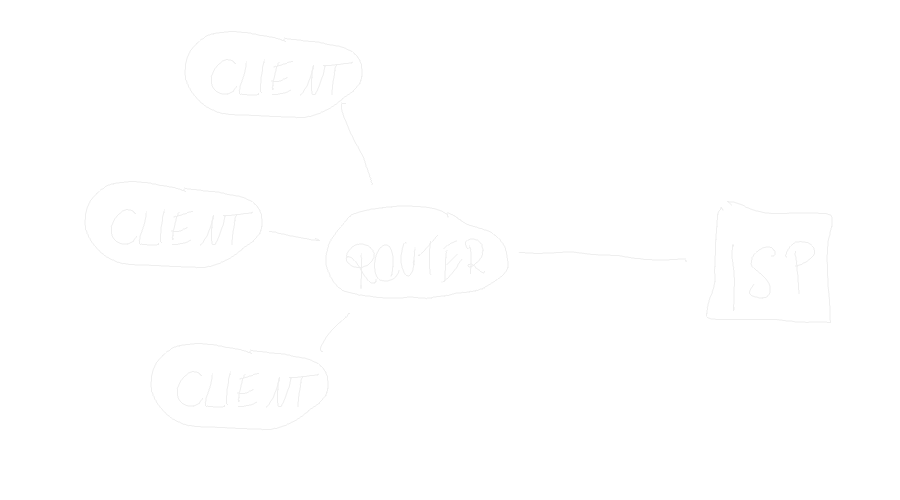
This simplified graph shows a very basic WiFi setup. The router serves as the hub, through which all other devices communicate. Router’s signal strength must be sufficient to reach all the devices. Typical WiFi network would use WPA2 security, which requires the end device to know a pre shared key to connect to the network.
Let’s see how Zigbee compares to that
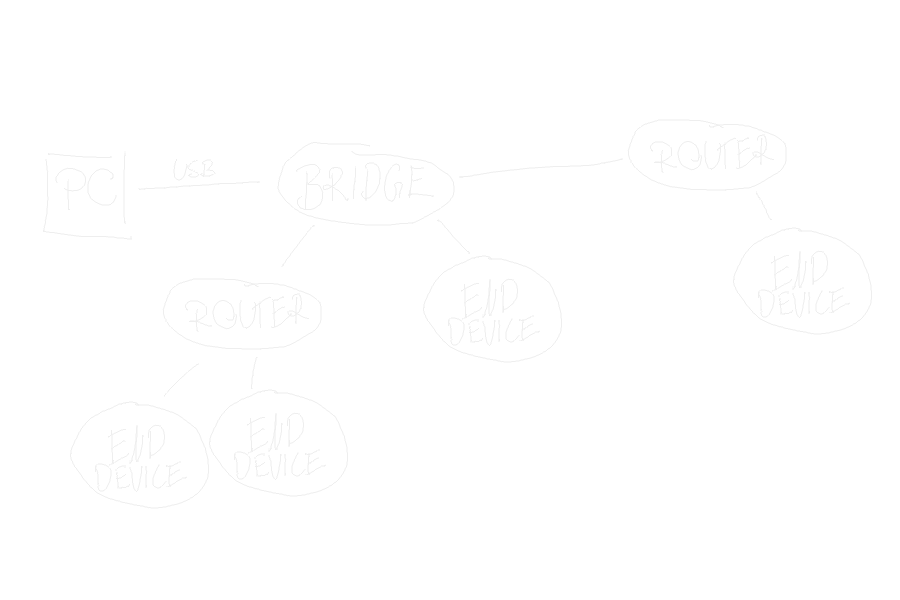
The first major difference you can spot is that there’s no central point all devices are connected to. We call this a mesh. On the picture there are three terms:
Bridge
Plugged via USB to your HA host, this is a device that let’s your instance talk to other Zigbee devices
Router
This is not a dedicated device as it was for WiFi; this can be any smart device like smart outlet. Typically most network-powered devices will serve as a router.
Router can forward the connection from other devices to the bridge, so even if the end device is cannot reach the bridge, it still can be a part of the network using Router as a relay.
End device
Basically any non-router, think of battery-powered devices like thermometers, remote control buttons, door sensors etc.
Advantages over WiFi
WiFi is designed for a wider range of applications and using it for smart home is definitely an option. It’s common and extremely widely adopted. Nevertheless it has it’s drawbacks.
Zigbee is designed with personal area networks in mind. Home automation devices are often battery powered we need low energy consumption, and this is where Zigbee shines. This is accomplished by combining low power radios and mesh network. The end device’s radio has to be just strong enough to reach the nearest router, not necessarily all the way to the bridge.
Reminder
As mentioned in the first post, I’m no expert in home automation, those are merely my learning notes. For a more detailed description and comparison of network types please consult the literature.
Selecting hardware
Hopefully the Zigbee is less mysterious by now. Typical PC or a Raspberry pi is not equipped to work with Zigbee. This is why we need to buy a bridge.
I decided to go with SONOFF Zigbee 3.0 USB Dongle Plus. It wasn’t an educated decision, I simply bought it because it was battle tested by my friends. The reviews online just confirm that.
Apart of the bridge, I needed something to control. For starters I’ve ordered Tuya NAS-WR01B smart plugs and IKEA Tradfri pilot to control them. The beauty if Zigbee is that it’s an open standard, so you can combine hardware from different providers.
Flashing Sonoff bridge
The SONOFF bridge I bought comes with preinstalled firmware, that doesn’t necessarily work well with all hardware providers. This is why we need to load custom firmware. Fortunately the OSS community comes to the rescue, the procedure is very simple. Here’s how you do it on Linux (should be pretty similar on Mac).
- Download and unzip the latest build of firmware compatible with the bridge: link to firmware release
- Unzip, this way you get the
.hexfile - Clone the boot loader repo: https://github.com/JelmerT/cc2538-bsl
- Install the dependencies
pyserialandintelhexwithpip install pyserial intelhex - Connect the Sonoff bridge
- Identify the create serial file for the bridge, by running
ls /dev/serial/by-id. You should find something like/dev/serial/by-id/usb-Silicon_Labs_Sonoff_Zigbee_3.0_USB_Dongle_Plus_0001-if00-port0 - Navigate to the cloned repository
- Flash that bridge by running
sudo python3 cc2538-bsl.py -p /dev/serial/by-id/usb-Silicon_Labs_Sonoff_Zigbee_3.0_USB_Dongle_Plus_0001-if00-port0 -evw --bootloader-sonoff-usb ./path/to/hex/file.hex
Remember to replace ./path/to/hex/file.hex with the path to the file unziped in the point 1.
With all those steps done, my bridge was ready to work. All I had to do was to plug it to the HA host and restart it. When running your instance in docker, make sure to map the /dev/serial/by-id/... file to the container.
Setting our first automation
Everything is ready now, let’s join the dots. Navigate to Settings -> Devices & Services and you should see Sonoff Zigbee device

Enter the device configuration and press Add Device on the bottom right. Make sure to have the paired device in close proximity to the bridge, HA will attempt to find and configure the new device.
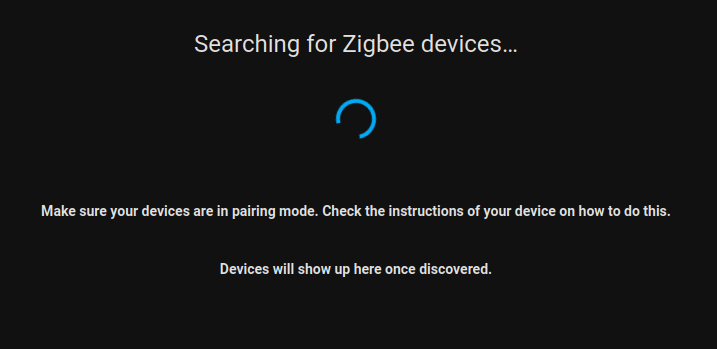
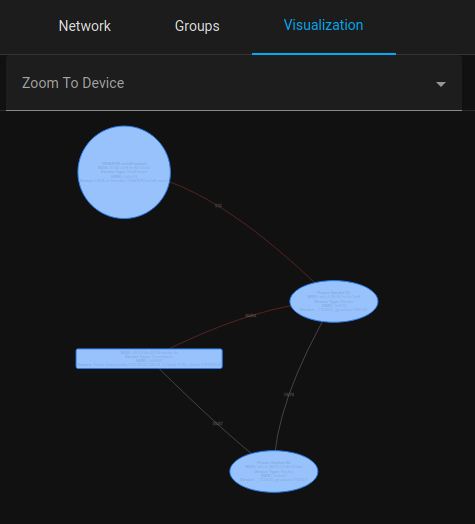
Now take your devices, plug them to power supply if required and enter the pairing mode as per the device instruction. Once you’re done, the device will show up on the Zigbee device graph
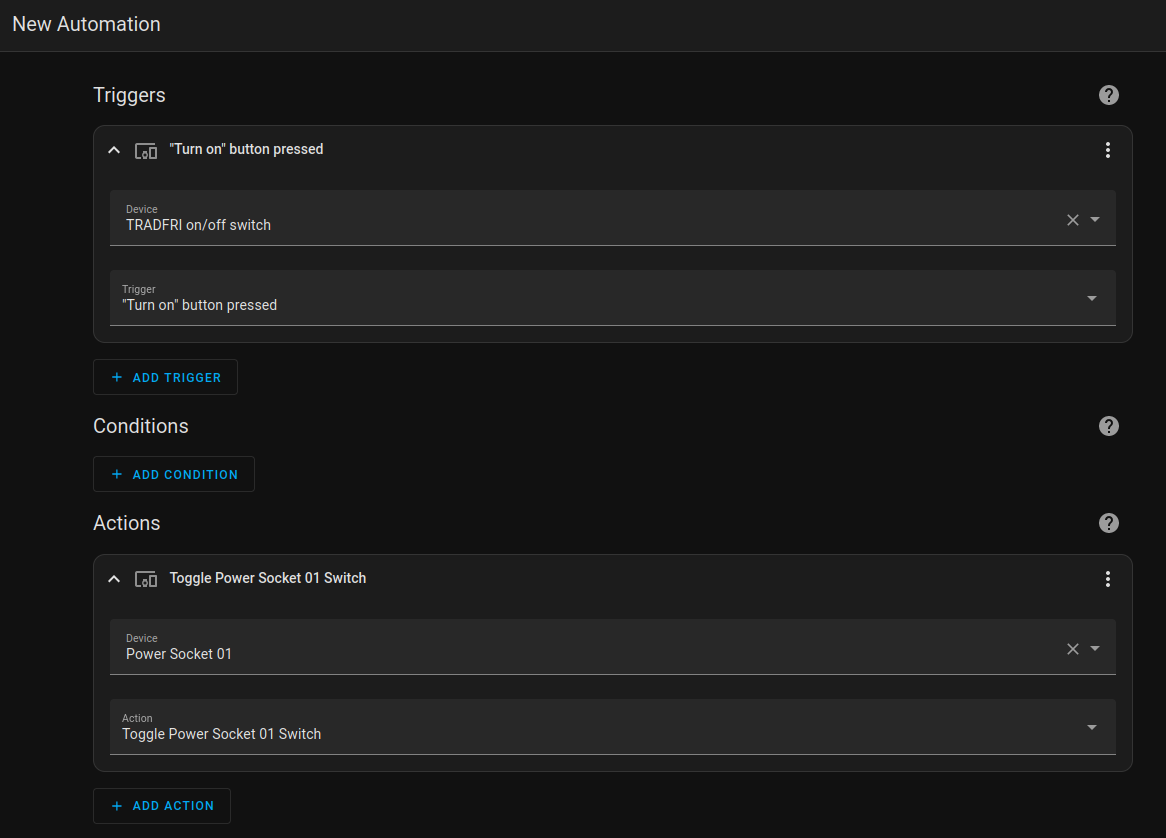
To set up an automation scenario, navigate to Settings -> Automation & Scenes, on the bottom right press Create Automation button and start with an empty automation. The simplest automation scenario when pressing a button switches the state of a power plug looks like this
This is the time to play with your setup, build something more complex, learn something new and enjoy!
Wrapping up
This post describes how I learned about Zigbee and a basic setup. Hope you enjoyed it!